You may need to uninstall Skype from your computer for some reasons. However, you will find that it is not so easy as you might think to uninstall Skype completely. Some of the Skype components are still left on your PC system so that you neither can install the higher version of it nor use other chatting software because of some conflicts between them. How to uninstall Skype completely? It is highly recommended you read this article and follow the methods to remove Skype easily and completely.

How to Uninstall Skype Manually?
If you are quite familiar with the computer, of course you can uninstall Skype yourself. Windows Add/Remove Programs is able to help you remove the program. However, you need to clean up the leftovers after you use the Windows uninstaller.
1. Please terminate Skype at first. You can press Ctrl+Alt+Delete to call out the task manager. And then end the Skype process.
2. Open Control Panel from Start menu.Click the Add/Remove program in the Control Panel. Select Skype and click Remove button.
3. You would receive message asking you: “are you sure you want to remove Skype 6.1 from your system?”, Click Yes to confirm and start the removal.
4. The removal will be finished in a few seconds.
If you also installed Skype click to call, and want to remove it as well, do the following steps:
Back to Add/Remove program.
Highlight Skype click to call in the program list, and click Remove button. Click Yes in the prompt and the removal will be started.
Note: Windows Add/Remove Programs can not remove the registry entries and associated files for you. So, you need to delete the files as below:
C:\Users\(Your computer name here)\AppData\Roaming\Macromedia\Flash Player\macromedia.com\support\flashplayer\sys, #skype.com (File folder)
C:\Users\(Your computer name here)\AppData\Local\Microsoft\Windows\WER\ReportArchive, Critical_Skype.exe_80df8b2524164676de88ee9244f81617431b3_138719b9
C:\ProgramData\Skype\{4E76FF7E-AEBA-4C87-B788-CD47E5425B9D}, SkypeToolbars (Windows Installer Package (.msi))
…
HKEY_CLASSES_ROOT\Local Settings\Software\Microsoft\Windows\Shell\MuiCache, “C:\Program Files\Skype\Phone\Skype.exe.ApplicationCompany – Skype Technologies S.A.”, “C:\Program Files\Skype\Phone\Skype.exe.FriendlyAppName – Skype”, “C:\Users\Delbert\Desktop\SkypeSetup.exe.ApplicationCompany – Skype Technologies S.A.”; …
HKEY_CLASSES_ROOT\TypeLib\{B9AA1F11-F480-4054-A84E-B5D9277E40A8}\1.0\0\win32, “(Default) – C:\Program Files\Skype\Phone\Skype.exe\3”
HKEY_CLASSES_ROOT\TypeLib\{B9AA1F11-F480-4054-A84E-B5D9277E40A8}\1.0\HELPDIR, “(Default) – (Default)”
Considering that registry is a critical component of Windows, in order to avoid system problems caused by mistaken deletion, we suggest you to create a backup for the registry before deleting any registry item.
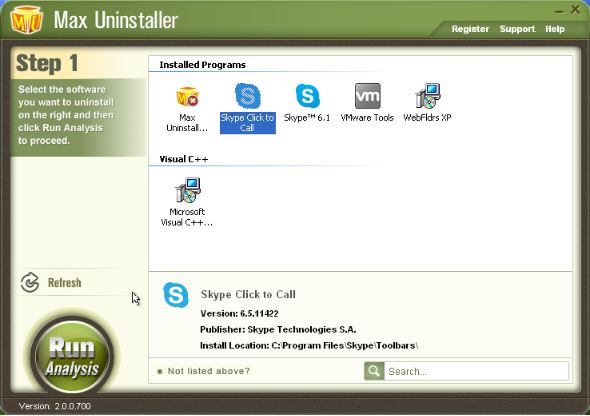
If you failed to uninstall Skype, or encounter uninstall error during the removal, please download Max Uninstaller and follow the below instruction to perform the removal again, which will definitely save your time and energy.

Please follow the easy steps to uninstall Skype automatically.
1. Click here to download Max Uninstaller, run the setup file to install it.
2. Install it and select Hotspot Shield then click “Analysis”
3. Make sure all the related file it detected are selected, and click “Complete Uninstall”
4. Click Leftovers after them have been scanned out.


