Many users who perform the free upgrade from Windows 7 or 8.1 to Windows 10 may suffer from massive lengthened boot times. The symptoms include a black screen after seeing Windows loading animation, and the ability to move your cursor around but an inability to do anything else. The process may last in excess of a minute.
In most cases, the sluggish boot-up time is not due to the voluminous size of the new OS but to some malware and non-optimized startup settings. What can you do to fix this issue? First, run an complete system malware scan to remove any possible malware infections. Windows 10 is still vulnerable to malicious virus and programs, and the old malware and virus could be the reason behind Windows 10 slow boot-up. After a thorough antivirus scan, you can modify your system settings to solve the problem. Here are some solutions to speed up boot times on your Windows 10.
Method 1:
- Right click the taskbar and choose Task Manager from the list.
- Click the Startup tab, click the Startup impact to list the items from High to None.
- Select the items with High/Medium/Low rating and click Disable bottom.
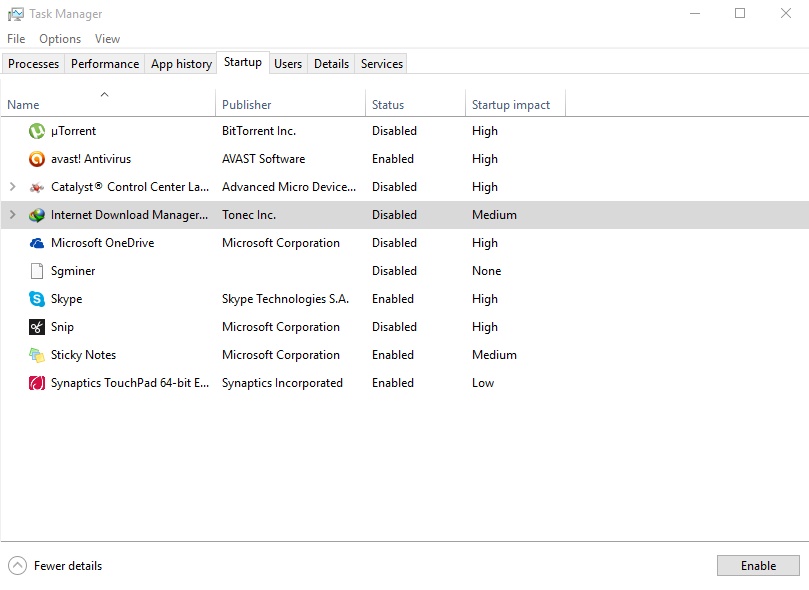
You can disable any startup items you think unnecessary to load when Windows boots up, including your antivirus software. AMD and Nvidia driver services can also be disabled without affecting the graphics performance of your system.
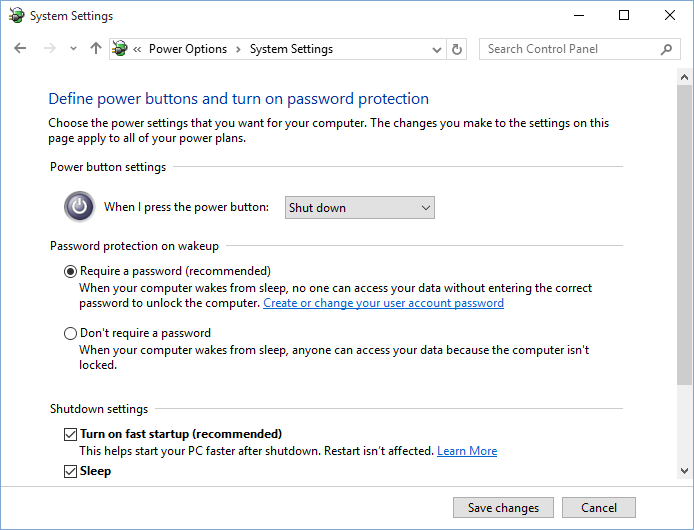
Method 2:
- Click Search icon, type “power options” and then hit Enter key.
- In the Power Options window, click Choose what the power button does on the left.
- In the System Settings window, click Change setting that are currently unavailable.
- Click Turn on fast startup under Shutdown settings, and then click Save changes.
Method 3:
- Right click Start, click Run, type in “services.msc” and hit Enter key.
- When the Service window opens, click Starup Type to sort the list of services.
- Observe the services which appear to take time to launch, double click the service with the Automatic startup type, and the Properties window shows up.
- Change the Startup type from Automatic to Automatic (Delayed start) or Manual.
- Click OK to save the change, close the window, and reboot your computer.

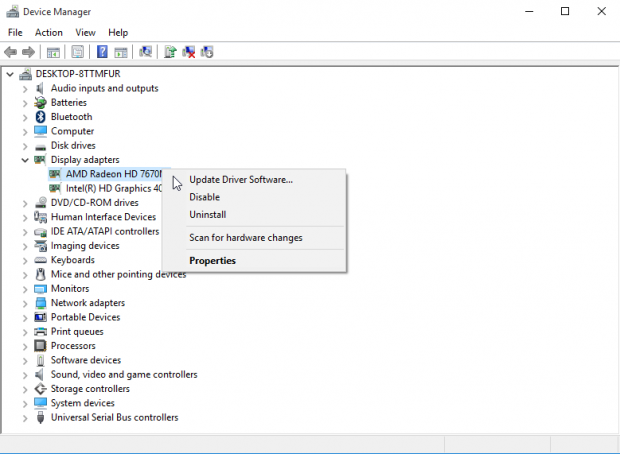
Method 4:
In some cases the black screen before boot is a graphic driver problem for the laptops that switch between Intel HD Graphics and a dedicated card from Nvidia or AMD. You can test to fix the problem by disable your AMD or Nvidia graphics driver.
- Right click Start menu and choose Device Manager from the list.
- Click Display adapter on the left, select your dedicated graphics card labelled Nvidia, AMD Radeon or ATi Radeon, right click on it and choose Disable from the list.
- Turn off your PC and start it again to see if the problem is solved.
Method 5:
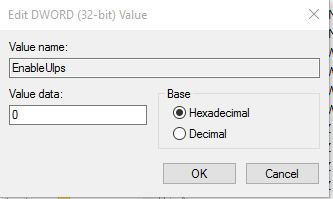
If you are having an AMD graphics card, you can disable a power saving feature so your system will no longer disable the second GPU when idle, and your Windows 10 may boot in under 30 seconds, compared to over 3 minutes for ULPS Enabled.
- Type “regedit” into Cortana and hit Enter to bring up Registry Editor.
- Press Ctrl + F to open the Find box, type EnableULPS and click Find Next.
- Double click EnableULPS and change the value from 1 to 0.
In this tutorial we’ve shown you several simple way to speed up Windows 10 slow boot time. Does any of them help troubleshoot your boot-up issue? If none of the aforementioned methods work for your case, you might need to restore Windows 10 to its default setting, or do a clean install of Windows 10 to see if that works.
Wanna get more How-to guides on system maintanence and security? Stay with us for fresh content on this website.

