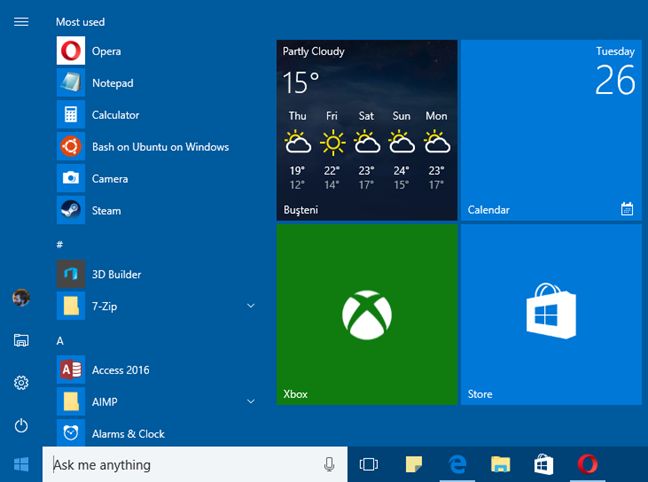
Windows 10 Anniversary Update has been released on August 2, coming with lots of changes and improvements. Today we are gonna talk about the revamped Start Menu. Perhaps the most obvious change in the Start Menu is that the All apps list is on display permanently. You don’t have to click on Start > All apps to open the alphabetical, scrollable list of installed apps. Besides, a narrow list on the left side of the Start Menu provides links to Power, File Explorer, Settings and your Microsoft account. To the right of the apps list you’ll see the tiles the same as before.
Yet, if you are using the previous version of Windows 10 and you want to configure the Start Menu to meet your demand too, you can also read this post to learn how it is done with a few clicks.
By default, Windows 10’s Start Menu consist of two major sections, and you can customize the Start Menu by removing or adding elements, regrouping tiles, and resizing layout, etc. Let’s get started now.
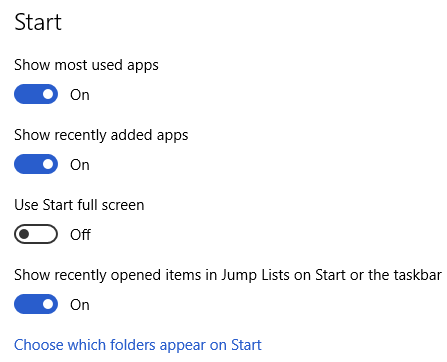
How to configure what’s shown on the Start Menu? Click on the Start menu, and select Settings. As the Settings app opens, click on Personalization, and then tap the Start in the column on the left. You will see several options on the right side for configuring what is shown on the Start Menu and how the Start Menu is displayed. You can enable or disable these options to display or hide them in the Start Menu.
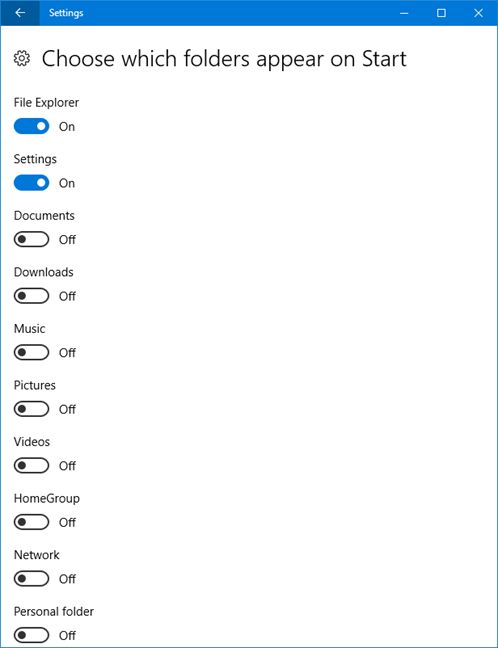
Back to the Personalization window, you can find a link called “Choose which folders appear on Start”. From here you can set the Start Menu to show many kinds of folders. Just tap the link there, and you can choose which folders are displayed from a predefined set of folders, which includes File Explorer, Settings, Documents, Downloads, Music, Pictures, Videos, HomeGroup, Network and your Personal folder.
If you set the switch under a folder to On, you will see its icon appear in the left sidebar of Start Menu. To hide it again, set the switch to Off. It is quite straightforward to add the aforementioned folders on the Start Menu, but unfortunately you cannot add a custom folder -this option is not available yet.
Now we come to the section of moving, grouping and resizing Start Menu tiles.
On the right side of the Start Menu are all its tiles and shortcuts organized in groups. By default, you can see only two groups on the Start Menu in Windows 10, namely, Life at a glance and Play and explore. Actually, you can create more groups and move tiles between groups too.
To move tiles and shortcuts you just need to drag and drop the tile or shortcut to the place you desire in Start Menu. To create a new group, you need to first choose the tile or shortcut you want to add to the new group, and then drag it to the empty place under the existing groups. You will see a colored rectangle, which means a new group will be created. To name the new group, you can hover your cursor above it to make Start Menu display a heading called Name group. Click on it, type the name you want, and press the Enter key, then you are able to assign the name to this new group.
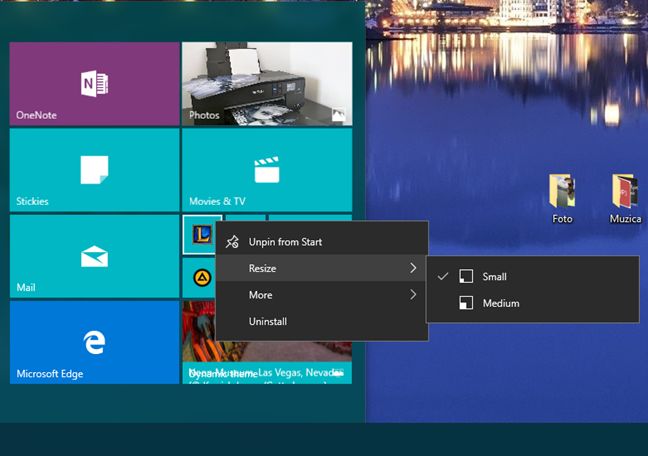
To resize app tiles from the Start Menu, simply right click the tile that you want to resize, move the cursor to Resize in the menu, and choose the size from Small, Medium, Wide to Large. Resizing the shortcuts offers you only two options: Small and Medium.
Now you know how easy it is to configure Start Menu in Windows 10.

